sábado, 21 de septiembre de 2013

Butter & milk-free Strawberry & Chocolate "Fraisier" ...and still tastes good!!

Español
Français 

Who said that healthy wasn't yummy? Let me present you this recipe I was meant to publish in  May...but it's never too late use to sing Kylie Minogue no! 
This cake is a "substitute" to the classical French fraisier, so laborious to prepare (I will have to give it a try one day). This one needs a bit of your attention, but it's quite easy to prepare. It is healthier as we are using less fatty ingredients, however as I just said, less fat doesn't mean less flavor. 

If you feel like reading a froggy cookery book this recipe is from Veggie by Cléa. Such a good work,  very interesting vegetarian dishes for any occasion. 
The key ingredient for a healthy dessert is silken tofu. Say goodbye to naughty double or whipped cream, butter and eggs! 
The agar agar play as well a crucial part, this seaweed powder allow any liquid preparations to  curdle, definitely a winner to me.  Unlike the pork gelatin it as no animal savor, no calories and even helps to lose weight :). I recommend here another book by Cléa: Agar Agar.

Here is the recipe (serve 6)


For the sponge cake:

  • 3 eggs
  • 90g of caster sugar
  • 90g of plain flour

For the strawberry mousse:

  • 300g of strawberries
  •  100g of brown sugar
  •  1 level teaspoon of agar agar 
  • 200g of silken tofu


For the chocolate cream:

  • 80g of milk or dark cooking chocolate
  • 200g of silken tofu
  • 100ml rice milk or soya, oat, quinoa, nuts etc...
  • 1 teaspoon of agar agar
  • About 15 strawberries for the edge and decoration 

. Let's start with the sponge cake. Beat the eggs with the sugar together in a waterproof recipient. Place over a bain-marie and whisk until pale and double in size. 
Remove from bain-marie but carry on beating until it has slightly cooled down.
. Sift over the flour in three times and fold in delicately. Pour the mixture in a cooking ring  (18-22cm) placed over a baking sheet in the oven tray. Cook for 15mn at 180ºC. Let it cool down.

. Remove the sponge cake from the circle and cut horizontally in two equal halves.
. Clean the strawberries and take off the leaves. In a blender mix 300g of the strawberries with the brown sugar. Pour in a pan.
Add the agar agar, stir well and bring this mixture to the boil. Let it simmer for 30 seconds- 1 minute. Pour in the blender again and mix in the tofu.
. In the circle place one half of the sponge cake. Pour the strawberry mousse on top. Place in the fridge 1 hour to set.
. Take out off the fridge and place the seconf half of the sponge cake. Decorate the edge of the cake with the rest of the strawberries cut in half, the cut parton the circle side (here I've had to cut the base of the strawberries too so they can fit in the mould).
. Melt the chocolate (microwave or bain marie) and mix with the tofu.
Stir together rhe milk and the agar agar, bring to the boil 10 seconds. Stir in the chocolate mixture and pour over the second half f sponge cake. Leave in the fridge for one more hour.

. Take out off the fridge and remove delicately/very slowly the circle. Decorte with fresh strawberries and ready!
I recommend serving it with a strawberry coulis.  

This  cake is a second cousin of the "fraisier", here we have no sponge cake with butter, no syrup, no buttercream, and no marzipan.  Only goodand healthy ingredients for a good looking vegetarian cake.t to have when you're controlling your weight.


miércoles, 19 de junio de 2013

Home-made Lemon Curd


Français  Español

Yes! There are ten thousand recipes for Lemon Curd on the internet…I know…but anyway here is recipe number ten thousand and one :)


It would be an insult to explain you (you british and American people) what lemon curd is and what it’s for… so let’s go straight to the recipe :)

Ingredients (for 2 medium crystal jars)


. 4 lemons, or 2 oranges, or 5 limes, preferably organic

. 2 whole eggs + 4 egg yolks

. 200g of sugar

. 60 grams of unsalted butter, at room temperature and cut into small cubes


Preparation

. Wash the lemon really well with a brush under water and zest with a grater. Only zest the yellow part of the skin, the white is too bitter.  We need to get two teaspoons (30 ml) of the zest. Set aside.

. Squeeze the lemons to get 160ml of juice. Pour in a strainer to make there are no seeds in the juice.

. Prepare a bain-marie. We need to make sure that the bottom of the recipient which will contain the lemon curd doesn’t touch the water; it has to be just on the top of it. I use a big pan for the water and a small one for the lemon curd.

. Whisk the juice, the whole eggs, the egg yolks and the sugar in a bowl until smooth. Add the butter cubes to the bowl, but don’t stir.

. Heat the water in the saucepan over low heat until it simmers (not boils). Pour the mixture in the small pan and place over the water. Stirring gently, but constantly, using a wooden spoon, cook until the curd has thickened and all of the butter has melted (10 minutes more or less). To test if the curd is thick enough, remove the spoon from the curd and check that it’s coated.

. Strain the curd over a bowl using a fine-mesh sieve and then stir in the zest. Pour in crystal jars, cover with plastic wrap pressed directly against the curd (to prevent a skin from forming) and chill for at least 3 hours.

Keep in the refrigerator for up to 3 days, or freeze for up to 1 month.

Enjoy!

Personally I can't stop dipping a spoon in the jar each time I pass by the fridge! 


This time I used it to make lemon meringue pies, heaven in my mouth!

miércoles, 12 de junio de 2013

Getting the next post ready...

Français  Español

I haven't disappeared...it's just that it's difficult for me to cope with a "trilingual" blog :)!

It's taking me ages to upload a recipe!! So I decided to take it easy and do things when I could. 
I have to apologize as the Spanish and French version already have the new recipe published, I'll get started with the English one from tomorrow. 

The next dish will be a vegetarian "fraisier", a healthy version of the traditional French patisserie, good for the bum and the mouth :)

Last month we celebrated my birthday  with a  chocolate & mayonnaise layer cake ...yes, mayonnaise! A lovely recipe from El Rincón de Bea, absolutely scrummy, spongy and 200% chocolate!
All home-made, the cake, the cake pops, the banner and the tin boxes. We had lots of fun.
See you very soon!


Many thanks to our sweet Marina who was our model for the day


I hope you enjoyed it, bisous!

domingo, 26 de mayo de 2013

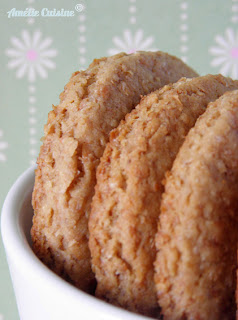
Home-made Digestive Biscuits

Español  Français

My partner eats oat Digestive for breakfast every day (yes mon chéri ...every day!). So as I was buying so many boxes of those biscuits I thought that I might save money and save his health at the same time making them myself...what I want to say is that home-made is always better than what is sold in the supermarket, you control the ingredients you're using. I know that they have quite an amount of calories per 100g  but at least I know what they're made of! 

I'm very happy with the result! They're very tasty and are quite similar to the ones you find in your supermarket.


Digestive biscuits are typical from England though you can find them all over the world nowadays. They exist since the end of the 19th century, it was called Digestive as it was believed that it would help digestion because of the one of its ingredients: sodium bicarbonate. You can have them with a nice cup of tea with milk or with cheese as stilton, cheddar etc..any cheese would do (even better with French cheese :))
My friend Tracey who is 200% British gave me her approval so here is the recipe (I found it on the amazing blog El Rincón de Bea).

Ingredients (for 20-22 biscuits)

  • 125 gr butter (room temperature)
  • 60 gr brown sugar
  • 1 table spoon of treacle/golden syrup
  • 1 egg (beaten)
  • 125 gr of flour
  • 150 gr of whole flour
  • 35 gr of whole wheat
  • 1 tea spoon of baking powder

Directions:

  • Cream the butter, sugar and golden syrup. Add the beaten egg in two times, it needs to blend in perfectly before adding the rest of the egg.
  • In another recipient sift the flours and the baking powder. Blend with the whole wheat.
  • Blend in the butter mixture in three times until you get a compact dough (start blending with a wooden spoon, then finish with your hands as it gets harder). Form a ball with the doe, wrap in cling film and leave in the fridge for an hour.
  • Roll the dough on a baking sheet until it's 5mm thick. With a round cookie cutter (7cm) cut the biscuits and place them on the oven tray on which we put a baking sheet before.
  • Leave in the fridge for 20mn.
  • Pre-heat the oven at 180º. Cook for 12 minutes or until brown (not too brown though!) Let them cool down a bit then place them on a cooling rack so they finish cooling.
  • Keep in a tin box. You can keep them for 5 days...but they'll disappear before of course!

They're really nice.  
Next time I'd like to try the Oat Digestive Biscuits.

viernes, 17 de mayo de 2013

Little birdies cupcakes

Français Español

Some sweet and funny cupcakes for my son's first birthday. 

I am very happy with the result. They're not that difficult to prepare, the medallions are made with white fondant, you just need to spend a little time on them but nothing complicated! Those cupcakes are nice to look at and very good to eat.
This recipe is always a success, a very good basic for your cupcakes. The buttercream recipe comes from the Spanish cupcakes goddess Alma Obregón from Objetivo Cupcake Perfecto, I have never  failed with her recipes; and the cake recipe is from a course I went to in Barcelona from Cup&Cake Barcelona. A lovely shop run by good professionals.

The medallions are a lovely idea from the amazing web page Sweetapolita.


Vanilla and white chocolate cupcakes with little birdies medallions

Ingredients * :

For the cakes (12-18 more or less)

  • 140 g of butter
  • 225 g of white sugar
  • 230 g of plain flour
  • 1 1/2 tablespoon of  baking powder
  • 2 eggs
  • 1 tablespoon of vanilla extract

For the buttercream

  • 250 g of butter
  • 250 g of icing sugar
  • 100g of white chocolate
  • 1 1/2 tea spoon of vanilla extract  
  • 1 tablespoon of milk
*All the ingredients need to be at room temperature. 

For the filling (optional)

  • Strawberry/raspberry jam

For the medallions

Material

  • one cupcakes/muffins tin
  • one electric whisk
  • cupcakes paper cups
  • a rolling pin
  • a rubber stamp
  • a small paintbrush
  • a cooling rack
  • a pipping bag and nozzle (I definitely recommend the 1 M-Wilton nozzle) 

Directions :


  • For the cupcakes : preheat the oven on 180 ° C, line the tin with the paper cases. 
  • Cream the butter and sugar together (low speed) until you obtain a smooth texture. 
  • Add one egg, beat and add the other egg, beat again.
  • Add the vanilla extract, Sift the flour with the baking powder. 
  • Pour a third of the flour on the buttercream and beat with the whisk (low speed). Add half of the milk, beat. Then pour the other third of the flour, the other half of the milk and finally the rest of the flour (it is important to always end with the flour). Careful not to beat to much and too long, just what we need to mix in the ingredients together.
  • Spoon the mixture into the paper cases until about two-third full (it's important not to "over-fill" the cases).
  • Bake for 20-25mn (until the point of a knife got off the cupcake clean). 
  • Remove from the oven and let the cupcakes cool for 5mn in the tin (this is very important, this helps the paper cases to stick to the cupcake). 
  • Remove the cupcakes from the tin and put on the cooling rack. 
 

  • For the buttercream : melt the chocolate at "bain-marie" or in the microwave (Make sure you don't cook it too long, otherwise the chocolate would burn and make lumps). Let it cool on the side.
  • In a big bowl sift the icing sugar, add the butter cut in dices, the milk and the vanilla extract.
  • Cover the bowl with a cloth (I use a plastic bag!) and start beating at low speed for 1 minute. Then beat on medium speed for 2 more minutes until the mixture gets whiter
  • Beat in the white chocolate, that as to cool nearly cold, and beat 2-4 more minutes. The more you beat the better! You never beat too much! (One essential rule for the buttercream frosting!).


  • For the decoration : knead the fondant with the rolling pin (don't forget to dust your work station with icing sugar so it doesn't stick) and cut out some circles with a cookie cutter. I made 20 of them in case I fail some of them with the stamping. Let them dry for 12h to 24h.
  • The following day, brush the stamp with the food coloring (stamp ordered at Rubbermoon Stamps, handmade, sweet and lovely!) and stamp each medallion. The second "stamping" always looks better as there is less food coloring on the stamp. (Always use a new stamp and new paintbrush that have never been used before).
  • Let them dry for 2 to 3 days.   


  • Assembling the cupcakes: when the cakes are cold, make a hole in the middle with the help of a corer or a knife) and fill them with jam (optional). And what do we do with those little pieces of cakes? ....we eat them of course! We definitely deserve it!
  • Pipe the buttercream on the cakes, from the centre to the edge or from the edge to the center. But as we  are going to cover them with the medallion it doesn't really matter if the piping isn't perfect.
  • Place each medallion on top of the cupcakes to finish with the decoration.